Pocket Edition + Raspberry PI Edition = Compatible

Do you have Minecraft Pocked Edition running on another device – like a iPhone, iPad, iPod Touch or Android Phone or Tablet?

If so — this post will tell you how you can connect Minecraft Pi Edition on Raspberry PI with Minecraft Pocket Edition on one of the devices above?

First here are two pics — one showing the stuffaboutcode big clock running on both raspberry pi and the iPod Touch, and the other showing effect of the rainbow script on the iPod Touch!!

photo rainbow

So why is this cool?  Well by doing this you can…

  1. Have two or more people playing Minecraft together – one on the Raspberr PI and one or more on the devices named above!
  2. If you run a python script against Minecraft on the Raspberry Pi — you can interact with it on one of the devices above!!

Here’s how to do this yourself

  1. Make sure both the raspberry pi and ios/android device are on the same home network as this won’t work over the internet.
  2. On your raspberry pi
    1. Start Minecraft
    2. Click Start Game
    3. Select the game you want to play
  3. On your iOS or Android device:
    1. Launch Minecraft Pocked Edition
    2. click join game.
    3. select “Steve Pi”

Thats it 🙂

Let us know in the comments how this works for you!

Yet another clock — but wow what a big one!

Yes we’ve seen quite a few clocks already from SleepyOz — but StuffAboutCode.com has posted perhaps the clock to end all minecraft clocks.  This one is huge!

Here’s the pics and video:

Here’s the code — also copied to <a href=”https://github.com/brooksc/mcpipy/blob/master/stuffaboutcode_clock.py”>the mcpipy collection of minecraft pi scripts</a>

#www.stuffaboutcode.com
#Raspberry Pi, Minecraft Analogue Clock

# mcpipy.com retrieved from URL below, written by stuffaboutcode
# http://www.stuffaboutcode.com/2013/02/raspberry-pi-minecraft-analogue-clock.html

#import the minecraft.py module from the minecraft directory
import mcpi.minecraft as minecraft
#import minecraft block module
import mcpi.block as block
#import time, so delays can be used
import time
#import datetime, to get the time!
import datetime
#import math so we can use cos and sin
import math

#mid point circle algorithm
def drawCircle(mc, x0, y0, z, radius, blockType):
    f = 1 - radius
    ddf_x = 1
    ddf_y = -2 * radius
    x = 0
    y = radius
    mc.setBlock(x0, y0 + radius, z, blockType)
    mc.setBlock(x0, y0 - radius, z, blockType)
    mc.setBlock(x0 + radius, y0, z, blockType)
    mc.setBlock(x0 - radius, y0, z, blockType)

    while x &lt; y:         if f &gt;= 0:
            y -= 1
            ddf_y += 2
            f += ddf_y
        x += 1
        ddf_x += 2
        f += ddf_x   
        mc.setBlock(x0 + x, y0 + y, z, blockType)
        mc.setBlock(x0 - x, y0 + y, z, blockType)
        mc.setBlock(x0 + x, y0 - y, z, blockType)
        mc.setBlock(x0 - x, y0 - y, z, blockType)
        mc.setBlock(x0 + y, y0 + x, z, blockType)
        mc.setBlock(x0 - y, y0 + x, z, blockType)
        mc.setBlock(x0 + y, y0 - x, z, blockType)
        mc.setBlock(x0 - y, y0 - x, z, blockType)

#Brensenham line algorithm
def drawLine(mc, x, y, z, x2, y2, blockType):
    steep = 0
    coords = []
    dx = abs(x2 - x)
    if (x2 - x) &gt; 0: sx = 1
    else: sx = -1
    dy = abs(y2 - y)
    if (y2 - y) &gt; 0: sy = 1
    else: sy = -1
    if dy &gt; dx:
        steep = 1 
        x,y = y,x
        dx,dy = dy,dx
        sx,sy = sy,sx
    d = (2 * dy) - dx
    for i in range(0,dx):
        if steep: mc.setBlock(y, x, z, blockType)
        else: mc.setBlock(x, y, z, blockType)
        while d &gt;= 0:
            y = y + sy
            d = d - (2 * dx)
        x = x + sx
        d = d + (2 * dy)
    mc.setBlock(x2, y2, z, blockType)

#find point on circle
def findPointOnCircle(cx, cy, radius, angle):
    x = cx + math.sin(math.radians(angle)) * radius
    y = cy + math.cos(math.radians(angle)) * radius
    return((int(x + 0.5),int(y + 0.5)))

def getAngleForHand(positionOnClock):
    angle = 360 * (positionOnClock / 60.0)
    return angle

def drawHourHand(mc, clockCentre, hours, minutes, blockType):
    if (hours &gt; 11): hours = hours - 12
    angle = getAngleForHand(int((hours * 5) + (minutes * (5.0/60.0))))
    hourHandEnd = findPointOnCircle(clockCentre.x, clockCentre.y, 10.0, angle)
    drawLine(mc, clockCentre.x, clockCentre.y, clockCentre.z - 1, hourHandEnd[0], hourHandEnd[1], blockType)

def drawMinuteHand(mc, clockCentre, minutes, blockType):
    angle = getAngleForHand(minutes)
    minuteHandEnd = findPointOnCircle(clockCentre.x, clockCentre.y, 18.0, angle)
    drawLine(mc, clockCentre.x, clockCentre.y, clockCentre.z, minuteHandEnd[0], minuteHandEnd[1], blockType)

def drawSecondHand(mc, clockCentre, seconds, blockType):
    angle = getAngleForHand(seconds)
    secondHandEnd = findPointOnCircle(clockCentre.x, clockCentre.y, 20.0, angle)
    drawLine(mc, clockCentre.x, clockCentre.y, clockCentre.z + 1, secondHandEnd[0], secondHandEnd[1], blockType)

#function to draw the clock
def drawClock(mc, clockCentre, radius, time):

    blockType = block.DIAMOND_BLOCK
    #draw the circle
    drawCircle(mc, clockCentre.x, clockCentre.y, clockCentre.z, radius, blockType)

    #draw hour hand
    drawHourHand(mc, clockCentre, time.hour, time.minute, block.DIRT)

    #draw minute hand
    drawMinuteHand(mc, clockCentre, time.minute, block.STONE)

    #draw second hand
    drawSecondHand(mc, clockCentre, time.second, block.WOOD_PLANKS)

#function to update the time on the clock
def updateTime(mc, clockCentre, lastTime, time):
    #draw hour and minute hand
    if (lastTime.minute != time.minute):
        #clear hour hand
        drawHourHand(mc, clockCentre, lastTime.hour, lastTime.minute, block.AIR)
        #new hour hand
        drawHourHand(mc, clockCentre, time.hour, time.minute, block.DIRT)

        #clear hand
        drawMinuteHand(mc, clockCentre, lastTime.minute, block.AIR)
        #new hand
        drawMinuteHand(mc, clockCentre, time.minute, block.STONE)

    #draw second hand
    if (lastTime.second != time.second):
        #clear hand
        drawSecondHand(mc, clockCentre, lastTime.second, block.AIR)
        #new hand
        drawSecondHand(mc, clockCentre, time.second, block.WOOD_PLANKS)

if __name__ == "__main__":

    clockCentre = minecraft.Vec3(0, 30, 0)
    radius = 20
    time.sleep(5)
    #Connect to minecraft by creating the minecraft object
    # - minecraft needs to be running and in a game
    mc = minecraft.Minecraft.create()

    #Post a message to the minecraft chat window 
    mc.postToChat("Hi, Minecraft Analogue Clock, www.stuffaboutcode.com")

    time.sleep(2)

    lastTime = datetime.datetime.now()
    #draw the clock
    drawClock(mc, clockCentre, radius, lastTime)
    #loop until Ctrl C is pressed
    try:
        while True:
            nowTime = datetime.datetime.now()
            #update the time on the clock
            updateTime(mc, clockCentre, lastTime, nowTime)
            lastTime = nowTime
            time.sleep(0.5)
    except KeyboardInterrupt:
        print "stopped"

#Permission is hereby granted, free of charge, to any person obtaining a copy of this software and associated documentation files (the "Software"), to deal in the Software without restriction, including without limitation the rights to use, copy, modify, merge, publish, distribute, sublicense, and/or sell copies of the Software, and to permit persons to whom the Software is furnished to do so, subject to the following conditions:
#
#The above copyright notice and this permission notice shall be included in all copies or substantial portions of the Software.
#
#THE SOFTWARE IS PROVIDED "AS IS", WITHOUT WARRANTY OF ANY KIND, EXPRESS OR IMPLIED, INCLUDING BUT NOT LIMITED TO THE WARRANTIES OF MERCHANTABILITY, FITNESS FOR A PARTICULAR PURPOSE AND NONINFRINGEMENT. IN NO EVENT SHALL THE AUTHORS OR COPYRIGHT HOLDERS BE LIABLE FOR ANY CLAIM, DAMAGES OR OTHER LIABILITY, WHETHER IN AN ACTION OF CONTRACT, TORT OR OTHERWISE, ARISING FROM, OUT OF OR IN CONNECTION WITH THE SOFTWARE OR THE USE OR OTHER DEALINGS IN THE SOFTWARE.

Original Post

How to run these scripts…

If you are new to python, you may be asking how to run these scripts on the raspberry pi.  Astrotutor answered the same question over on the forums as follows:

Save the file in the same folder as the minecraft.py file, that is mcpi/api/python/mcpi.
Then open the game from the LXTerminal by typing
cd mcpi (enter)
./minecraft-pi
Then from another opened LXTerminal (this is how I do it) type
cd mcpi/api/python (Enter)
python scriptName.py

One note — all the scripts here assume there is a “mcpi” subdirectory in the same directory as the script — and the mcpi contains all of the python scripts used to interact with minecraft.  These are all up on the github as well!

Hope this helps

Edit: Thanks for the comments, in whatever directory you are running the scripts — you must have a subdirectory named mcpi.  e.g.

script.py
mcpi/minecraft.py
mpi/…

run “python script.py” and it should run fine…

Bunker v2 script

Burnaround updated his bunker code, here’s a list of his changes

I improved it, in order to adjust the size of the chambers and other variables of the bunker just changing the variable’s values of the code, like the deepness of the bunker, the position…

Code is below and on github as usual.  (I fixed some issues with the whitespace vs. what’s on the forums)

# mcpipy.com retrieved from URL below, written by burnaron
# http://www.minecraftforum.net/topic/1689199-my-first-script-bunkermaticpy/

import mcpi.minecraft as minecraft
import mcpi.block as block
from math import *
mc = minecraft.Minecraft.create()
x1 = -4
y1 = 3
z1 = 9
long_tun = 10
long_arc_ch = 8
long_ch = 26
long_m_ch = long_ch - 2 * long_arc_ch
deepness = 60
high_c_ch = 3

# FASE 1: cleaning zone
mc.setBlocks(x1-2,y1,z1-2,x1+2,y1+20,z1+2,0)
mc.setBlocks(x1-(long_tun+long_ch+1),y1-(deepness+1),z1-(long_tun+long_ch+1),x1+long_tun+long_ch+1,y1-(deepness-long_arc_ch-2-1),z1+long_tun+long_ch+1,1)

# FASE 2: establishing access
mc.setBlocks(x1-1.5,y1+2,z1-1.5,x1+1.5,y1-deepness,z1+1.5,1)
mc.setBlocks(x1-1,y1+2,z1-1,x1-1,y1-deepness,z1-1,0)

# FASE 3: establishing main tunnels, central chamber &amp; and access stairs
# FASE 3.1: establishing central chamber
mc.setBlocks(x1-1,y1-deepness,z1-1,x1+1,y1-(deepness-high_c_ch),z1+1,0)

# FASE 3.2: establishing main tunnels
mc.setBlocks(x1-(long_tun+long_ch),y1-deepness,z1,x1+long_tun+long_ch,y1-(deepness-1),z1,0)
mc.setBlocks(x1,y1-deepness,z1-(long_tun+long_ch),x1,y1-(deepness-1),z1+long_tun+long_ch,0)

# FASE 3.3: establishing access stairs
mc.setBlocks(x1-1,y1+2,z1-1,x1-1,y1-deepness,z1-1,65,3)

# FASE 4: establishing main chambers
for pos in range(0,long_arc_ch):
mc.setBlocks(x1+long_tun+pos,y1-deepness,z1-pos,x1+long_tun+pos,y1-(deepness-2)+pos,z1+pos,0)
mc.setBlocks(x1-long_tun-pos,y1-deepness,z1-pos,x1-long_tun-pos,y1-(deepness-2)+pos,z1+pos,0)
mc.setBlocks(x1-pos,y1-deepness,z1+long_tun+pos,x1+pos,y1-(deepness-2)+pos,z1+long_tun+pos,0)
mc.setBlocks(x1-pos,y1-deepness,z1-long_tun-pos,x1+pos,y1-(deepness-2)+pos,z1-long_tun-pos,0)

mc.setBlocks(x1+long_tun+long_arc_ch,y1-deepness,z1-long_arc_ch,x1+long_tun+long_arc_ch+long_m_ch,y1-(deepness-2)+long_arc_ch,z1+long_arc_ch,0)
mc.setBlocks(x1-(long_tun+long_arc_ch),y1-deepness,z1-long_arc_ch,x1-(long_tun+long_arc_ch)-long_m_ch,y1-(deepness-2)+long_arc_ch,z1+long_arc_ch,0)
mc.setBlocks(x1-long_arc_ch,y1-deepness,z1+long_tun+long_arc_ch,x1+long_arc_ch,y1-(deepness-2)+long_arc_ch,z1+long_tun+long_arc_ch+long_m_ch,0)
mc.setBlocks(x1-long_arc_ch,y1-deepness,z1-(long_tun+long_arc_ch),x1+long_arc_ch,y1-(deepness-2)+long_arc_ch,z1-(long_tun+long_arc_ch)-(long_m_ch),0)

for pos in range(0,long_arc_ch):
mc.setBlocks(x1+long_tun+long_arc_ch+long_m_ch+pos,y1-deepness,z1-long_arc_ch+pos,x1+long_tun+long_arc_ch+long_m_ch+pos,y1-(deepness-2)+long_arc_ch-pos,z1+long_arc_ch-pos,0)
mc.setBlocks(x1-(long_tun+long_arc_ch)-long_m_ch-pos,y1-deepness,z1-long_arc_ch+pos,x1-(long_tun+long_arc_ch)-long_m_ch-pos,y1-(deepness-2)+long_arc_ch-pos,z1+long_arc_ch-pos,0)
mc.setBlocks(x1-long_arc_ch+pos,y1-deepness,z1+long_tun+long_arc_ch+long_m_ch+pos,x1+long_arc_ch-pos,y1-(deepness-2)+long_arc_ch-pos,z1+long_tun+long_arc_ch+long_m_ch+pos,0)
mc.setBlocks(x1-long_arc_ch+pos,y1-deepness,z1-(long_tun+long_arc_ch)-long_m_ch-pos,x1+long_arc_ch-pos,y1-(deepness-2)+long_arc_ch-pos,z1-(long_tun+long_arc_ch)-long_m_ch-pos,0)

# FASE 5: establishing lights &amp; doors:
# FASE 5.1: central chamber lights:
mc.setBlock(x1,y1-(deepness-2),z1+1,50)
mc.setBlock(x1+1,y1-(deepness-2),z1,50)
mc.setBlock(x1,y1-(deepness-2),z1-1,50)
mc.setBlock(x1-1,y1-(deepness-2),z1,50)

# FASE 5.2: main chambers lights
for pos in range(2,long_arc_ch):
mc.setBlock(x1+pos,y1-(deepness-2),z1+long_tun+pos,50)
mc.setBlock(x1-pos,y1-(deepness-2),z1+long_tun+pos,50)
mc.setBlock(x1+pos,y1-(deepness-2),z1-long_tun-pos,50)
mc.setBlock(x1-pos,y1-(deepness-2),z1-long_tun-pos,50)
mc.setBlock(x1+long_tun+pos,y1-(deepness-2),z1+pos,50)
mc.setBlock(x1+long_tun+pos,y1-(deepness-2),z1-pos,50)
mc.setBlock(x1-long_tun-pos,y1-(deepness-2),z1+pos,50)
mc.setBlock(x1-long_tun-pos,y1-(deepness-2),z1-pos,50)

for pos in range(0,long_m_ch,2):
mc.setBlock(x1+long_arc_ch,y1-(deepness-2),z1+long_tun+long_arc_ch+pos,50)
mc.setBlock(x1-long_arc_ch,y1-(deepness-2),z1+long_tun+long_arc_ch+pos,50)
mc.setBlock(x1+long_arc_ch,y1-(deepness-2),z1-(long_tun+long_arc_ch)-pos,50)
mc.setBlock(x1-long_arc_ch,y1-(deepness-2),z1-(long_tun+long_arc_ch)-pos,50)
mc.setBlock(x1+long_tun+long_arc_ch+pos,y1-(deepness-2),z1+long_arc_ch,50)
mc.setBlock(x1+long_tun+long_arc_ch+pos,y1-(deepness-2),z1-long_arc_ch,50)
mc.setBlock(x1-(long_tun+long_arc_ch)-pos,y1-(deepness-2),z1+long_arc_ch,50)
mc.setBlock(x1-(long_tun+long_arc_ch)-pos,y1-(deepness-2),z1-long_arc_ch,50)

for pos in range(0,7):
mc.setBlock(x1+long_arc_ch-pos,y1-(deepness-2),z1+long_tun+long_arc_ch+long_m_ch+pos,50)
mc.setBlock(x1-long_arc_ch+pos,y1-(deepness-2),z1+long_tun+long_arc_ch+long_m_ch+pos,50)
mc.setBlock(x1+long_arc_ch-pos,y1-(deepness-2),z1-(long_tun+long_arc_ch)-long_m_ch-pos,50)
mc.setBlock(x1-long_arc_ch+pos,y1-(deepness-2),z1-(long_tun+long_arc_ch)-long_m_ch-pos,50)
mc.setBlock(x1+long_tun+long_arc_ch+long_m_ch+pos,y1-(deepness-2),z1+long_arc_ch-pos,50)
mc.setBlock(x1+long_tun+long_arc_ch+long_m_ch+pos,y1-(deepness-2),z1-long_arc_ch+pos,50)
mc.setBlock(x1-(long_tun+long_arc_ch)-long_m_ch-pos,y1-(deepness-2),z1+long_arc_ch-pos,50)
mc.setBlock(x1-(long_tun+long_arc_ch)-long_m_ch-pos,y1-(deepness-2),z1-long_arc_ch+pos,50)

Found on the forums here

Teleporting between locations via python…

Obsidz created a teleportation script, first the pics (of fleap3’s pads, hard to show a pic of teleporting…)

2013-02-16_11.30.16 2013-02-16_11.30.26

Here’s how it works:

  1. The user creates a Nether Reactor Core block, surrounded by cobblestone in one location
  2. And then creates another of the same — in a different location.  These become the “teleportation station”
  3. Run the script
  4. Travel as usually over the two pads
  5. Now when you travel over one pad in the future – you will teleport to the other

Note as well — the script only works with a single person.  Fleap3 also had a problem going through the same portal multiple times (we haven’t debugged this).

The code below is Obsidz original code — the version in github has two changes:

  1. To enable this to run on the bukkit mode, I made it easy to switch between the “magic blocks”.  I use diamond for the bukkit server.
  2. When running this we had some trouble getting it to work with manually created pads – so I have the script send to chat when it recognizes a pad.

Finally I also created a quick script to automate the pad creation as well.  Here is the script in github.

Enjoy:

import mcpi.minecraft as minecraft
import mcpi.block as block
import time

#Author:                Obsidz
#
#Description:   This is a teleport pad script.
#                          To create a pad, place a nether reactor core onto a location and ring with cobbledtone blocks
#                          To add to locations list walk over it
#
#Notes:          Pads added to list by walking over them
#                          Pads not removed if destroyed but can be teleported to but not from
#                          You cannot teleport to the same pad without modifying script
#                          Pads need to be added each time the script is run

LPLoc = list()

Pads = 0
Cpad = 0
def isLaunchPad(): #checks if the the location below the player is a teleporting pad
                loc = mc.player.getPos()
                if ((mc.getBlock(loc.x,loc.y-1,loc.z) == block.NETHER_REACTOR_CORE.id) and
                        (mc.getBlock(loc.x-1,loc.y-1,loc.z-1) == block.COBBLESTONE.id) and
                        (mc.getBlock(loc.x-1,loc.y-1,loc.z) == block.COBBLESTONE.id) and
                        (mc.getBlock(loc.x-1,loc.y-1,loc.z+1) == block.COBBLESTONE.id) and
                        (mc.getBlock(loc.x,loc.y-1,loc.z+1) == block.COBBLESTONE.id) and
                        (mc.getBlock(loc.x,loc.y-1,loc.z-1) == block.COBBLESTONE.id) and
                        (mc.getBlock(loc.x+1,loc.y-1,loc.z-1) == block.COBBLESTONE.id) and
                        (mc.getBlock(loc.x+1,loc.y-1,loc.z) == block.COBBLESTONE.id) and
                        (mc.getBlock(loc.x+1,loc.y-1,loc.z+1) == block.COBBLESTONE.id)):
                        addLPLoc(loc)
                        return True
                else:
                        return False
def addLPLoc(Vec3): #Loggs the location of the pad for future use
        global Pads
        global LPLoc

        inList = False
        if Pads &gt; 0:
                for loc in LPLoc:
                        if (loc.x == Vec3.x and loc.y == Vec3.y and loc.z == Vec3.z):
                                inList = True

        if not inList:
                LPLoc.append(Vec3)
                Pads =  len(LPLoc)
def locCheck(): #Checks that you are not teleporting to the same pad

        global Cpad
        global LPLoc
        loc = mc.player.getPos()
        if (loc.x == LPLoc[Cpad].x and loc.y == LPLoc[Cpad].y and loc.z == LPLoc[Cpad].z):
                Cpad = Cpad + 1
def TPChar(): #sends the character to the next pad
        global Pads
        global Cpad
        global LPLoc

        if Pads &gt; 1:
                mc.player.setPos(LPLoc[Cpad].x,LPLoc[Cpad].y + 1,LPLoc[Cpad].z)
                Cpad = ( Cpad + 1) %  Pads
                time.sleep(3.0)

if __name__ == "__main__": # The script

        mc = minecraft.Minecraft.create()
        while True:
                if isLaunchPad():
                        TPChar()

                time.sleep(0.1)

Originally found here…

TNT Snake

Here’s an odd one – perhaps for fun or maybe it’s art. It’s a random snake that converts whatever it touches into TNT. Unfortunately you can’t blow it up on Minecraft Pi Edition as only creative mode is implemented, but if you are using the bukkit server — it’s a nice way to clear a mountain and perhaps crash your client from excessive explosions.

Enjoy the video, pics and code below! Source on github as usual.

2013-02-15_16.06.39 2013-02-15_16.16.13 2013-02-15_17.11.59 2013-02-15_16.24.43

#!/usr/bin/env python

# Posted to mcpipy.com, created by brooksc and fleap3 aka mrfleap 🙂

# This script will:
# 1. Create a snake that will pick a random direction.
# if max_direction is set to 3, it will go backward/forward/left/right.  Set to 5 and it goes up/down.
# 2. Head in that direction for a random # of blocks from min_distance and max_distance
# leave a 5 block "plus" of TNT in it's path
# 3. Pick a new direction and go in that direction
# It should not double back on itself or go the same direction...

#import the minecraft.py module from the minecraft directory
import mcpi.minecraft as minecraft
#import minecraft block module
import mcpi.block as block
#import time, so delays can be used
import time
import random
import math

def new_direction(old_direction):
    max_direction = 5
#    max_direction = 3

    directions = ["Forward", "Left", "Right", "Backward", "Up", "Down"]
    direction_opposite = [3,2,1,0,5,4]
    direction = old_direction
    while direction == old_direction and direction != direction_opposite[direction]:
        direction = random.randint(0, max_direction)
    print "changing direction from %s to %s" % (directions[old_direction], directions[direction])
    return direction

if __name__ == "__main__":

    #Connect to minecraft by creating the minecraft object
    # - minecraft needs to be running and in a game
    mc = minecraft.Minecraft.create()
    mc.setBlocks(-10,-10,-10,10,100,10,block.AIR)

    x = 0.0
    y = 0.0
    z = 0.0
    max_x = 50
    max_y = 10
    max_z = 50
    min_distance = 10
    max_distance = 100
    direction = -1
    directions = ["Forward", "Left", "Right", "Backward", "Up", "Down"]
    while True:
        mc.setBlock(x, y, z, block.DIAMOND_BLOCK)
        time.sleep(2)

        direction = new_direction(direction)
        duration = random.randint(min_distance, max_distance)
        print "New Roll: %s direction (%d) for %s more cycles!" % (directions[direction], direction,  duration)
#        time.sleep(3)
        while duration &gt; 0:
            mc.setBlock(x, y, z, block.TNT)
            if direction == 0 or direction == 3:
                # Going forward or back Adjust Z
                mc.setBlock(x, y, z-1, block.TNT)
                mc.setBlock(x, y, z+1, block.TNT)
                mc.setBlock(x, y-1, z, block.TNT)
                mc.setBlock(x, y+1, z, block.TNT)
            elif direction == 1 or direction == 2:
                # Going left or right Adjust X
                mc.setBlock(x-1, y, z, block.TNT)
                mc.setBlock(x+1, y, z, block.TNT)
                mc.setBlock(x, y-1, z, block.TNT)
                mc.setBlock(x, y+1, z, block.TNT)
            else:
                # Going up or down, Adjust Y
                mc.setBlock(x-1, y, z, block.TNT)
                mc.setBlock(x+1, y, z, block.TNT)
                mc.setBlock(x, y, z-1, block.TNT)
                mc.setBlock(x, y, z+1, block.TNT)
            time.sleep(.25)
            if direction == 0:
                # forward
                x += 1
                if math.fabs(x) &gt; max_x:
                    direction = new_direction(direction)
                    x -= 2
            elif direction == 1:
                # left
                z -= 1
                if math.fabs(z) &gt; max_z:
                    direction = new_direction(direction)
                    z += 2
            elif direction == 2:
                # right
                z += 1
                if math.fabs(z) &gt; max_z:
                    direction = new_direction(direction)
                    z -= 2
            elif direction == 3:
                # backward
                x -= 1
                if math.fabs(x) &gt; max_x:
                    direction = new_direction(direction)
                    x += 2
            elif direction == 4:
                # up
                y += 1
                if math.fabs(y) &gt; max_y:
                    # if it's going further than max_y allows, turn it around
                    direction = new_direction(direction)
                    y -= 2
            elif direction == 5:
                # down
                y -= 1
                if math.fabs(y) &gt; max_y:
                    # if it's going further than max_y allows, turn it around
                    direction = new_direction(direction)
                    y += 2
            else:
                print "Error! %s" % (direction)

            duration -= 1
            print "Going %s for %s more cycles" % (directions[direction],duration)

Maze

Dave Finch (aka davef21370)  has created a nice random maze generator!  Check out the images and source below, the program is also on github.

2013-02-16_08.36.15 2013-02-16_08.36.51


# Quick rough &amp; ready maze generator for Minecraft Pi edition.
# Dave Finch 2013

import minecraft, block
import sys, random
from random import randint as rand

# Connect to Minecraft.
try:
    mc = minecraft.Minecraft.create()
except:
    print "Cannot connect to Minecraft."
    sys.exit(0)

# Create a function for picking a random direction.
def randDir():
    r = rand(0,3)
    if r == 0: rv = (0,-1) # Up.
    if r == 1: rv = (0,1) # Down.
    if r == 2: rv = (-1,0) # Left.
    if r == 3: rv = (1,0) # Right.
    return rv

# Create a function to initialize the maze.
# w and h are the width and height respectively.
def initMaze(w,h):
    global maze,spl

    # Create a 2 dimensional array.
    maze = [[0]*h for x in range(w)]

    # Create four walls around the maze.
    # 1=wall, 0=walkway.
    for x in range(0,w):
        maze[x][0] = maze[x][h-1] = 1
        makeWall(ppos.x+x,ppos.z+0)
        makeWall(ppos.x+x,ppos.z+h-1)
    for y in range(0,mazeYSize):
        maze[0][y] = maze[w-1][y] = 1
        makeWall(ppos.x,ppos.z+y)
        makeWall(ppos.x+w-1,ppos.z+y)

    # Make every other cell a starting point.
    # 2=starting point.
    # Also create a list of these points to speed up the main loop.
    spl = []
    for y in range(2,h-2,2):
        for x in range(2,w-2,2):
            maze[x][y] = 2
            spl.append((x,y))
    # Shuffle the list of points and we can choose a random point by
    # simply "popping" it off the list.
    random.shuffle(spl)

def makeWall(x,z):
    mc.setBlock(x,ppos.y,z,block.STONE)
    mc.setBlock(x,ppos.y+1,z,block.STONE)
    mc.setBlock(x,ppos.y+2,z,block.STONE)

# Define the X and Y size of the maze including the outer walls.
# These values aren't checked but must be positive odd integers above 3.
mazeXSize = 35
mazeYSize = 35

# Set the maximum length of a wall.
maxWallLen = 1

# Find position of player and set base of maze 3 blocks lower.
ppos = mc.player.getPos()
ppos.y -= 3

# Clear an area for the maze.
for x in range(0,mazeXSize-1):
    for z in range(mazeYSize-1):
        mc.setBlock(ppos.x+x,ppos.y,ppos.z+z,block.STONE)
        for y in range(1,5):
            mc.setBlock(ppos.x+x,ppos.y+y,ppos.z+z,block.AIR)

# Create an empty maze.
initMaze(mazeXSize,mazeYSize)

# Loop until we have no more starting points (2's in the empty maze)
while filter(lambda x: 2 in x, maze):
    # Get the X and Y values of the first point in our randomized list.
    rx = spl[0][0]
    ry = spl[0][1]
    # Pop the first entry in the list, this deletes it and the rest move down.
    spl.pop(0)
    # Check to see if our chosen point is still a valid starting point.
    ud = False
    if maze[rx][ry] == 2:
        ud = True
        # Pick a random wall length up to the maximum.
        rc = rand(0,maxWallLen)
        # Pick a random direction.
        rd = randDir()
        fc = rd
        loop = True
        while loop:
            # Look in each direction, if the current wall being built is stuck inside itself start again.
            if maze[rx][ry-2] == 3 and maze[rx][ry+2] == 3 and maze[rx-2][ry] == 3 and maze[rx+2][ry] == 3:
                #
                # Code to clear maze area required
                #
                initMaze(mazeXSize,mazeYSize)
                break
            # Look ahead to see if we're okay to go in this direction.....
            cx = rx + (rd[0]*2)
            cy = ry + (rd[1]*2)
            nc = maze[cx][cy]
            if nc != 3:
                for i in range(0,2):
                    maze[rx][ry] = 3
                    makeWall(ppos.x+rx,ppos.z+ry)
                    rx += rd[0]
                    ry += rd[1]
            # .....if not choose another direction.
            else: rd = randDir()
            # If we hit an existing wall break out of the loop.
            if nc == 1: loop = False
            # Update our wall length counter. When this hits zero pick another direction.
            # This also makes sure the new direction isn't the same as the current one.
            rc -= 1
            if rc &lt;= 0:
                rc = rand(0,maxWallLen)
                dd = rd
                de = (fc[0]*-1,fc[1]*-1)
                while dd == rd or rd == de:
                    rd = randDir()
    # The latest wall has been built so change all 3's (new wall) to 1's (existing wall)
    if ud:
        for x in range(0,mazeXSize):
            for y in range(0,mazeYSize):
                if maze[x][y] == 3: maze[x][y] = 1<

Original Post

Creating a flat map for your next creation…

Snowbound created a nifty script to create a wide flat desert in your minecraft world.  Run this and everything above “sea level” will be replaced with sandstone.  Everything is gone – you may just see the remains of some trees or other items.

2013-02-14_20.20.28 2013-02-14_20.21.55 2013-02-14_20.31.10

Source code is below and on the repro here.

import sys
import mcpi.minecraft as minecraft
import mcpi.block as block

mc = minecraft.Minecraft.create()
mc.setBlocks(-128,0,-128,128,64,128,0)
if(len(sys.argv) &gt; 1):
        bid = int(sys.argv[1])
else:
        bid = block.SANDSTONE.id

if bid  108:
        bid = block.SANDSTONE.id

mc.setBlocks(-128,0,-128,128,-64,128,bid)

Source

Underground Bunker!

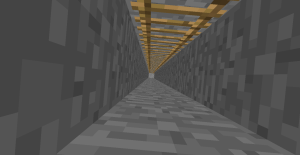
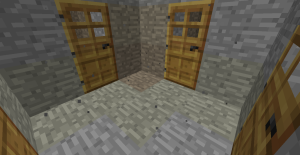
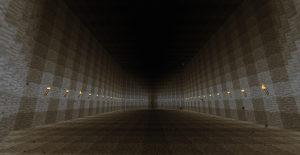
burnaround has posted an interesting script — it creates an underground bunker.  A ladder appears going deep into the ground, with torches to light the way.  At the bottom the corridor goes off in 4 directions – and there are 4 large rooms (perhaps with mobs!)

It’s pretty cool and a must to check out.  Here are some images

2013-02-14_20.29.08 2013-02-14_20.29.26 2013-02-14_20.30.08

The source is on the repo here.

And here is the code:

# mcpipy.com retrieved from URL below, written by burnaron
# http://www.minecraftforum.net/topic/1689199-my-first-script-bunkermaticpy/

import mcpi.minecraft as minecraft
import mcpi.block as block
from math import *

mc = minecraft.Minecraft.create()
x1 = 0
y1 = 0
z1 = 0
# FASE 1: cleaning zone
mc.setBlocks(x1-2,y1,z1-2,x1+2,y1+20,z1+2,0)
mc.setBlocks(x1-51,y1-61,z1-51,x1+51,y1-19,z1+51,1)
# FASE 2: establishing access
mc.setBlocks(x1-1.5,y1+2,z1-1.5,x1+1.5,y1-60,z1+1.5,1)
mc.setBlocks(x1-1,y1+2,z1-1,x1-1,y1-60,z1-1,0)
# FASE 3: establishing main tunnels
mc.setBlocks(x1-1,y1-60,z1-1,x1+1,y1-56,z1+1,0)
mc.setBlocks(x1-50,y1-60,z1,x1+50,y1-58,z1,0)
mc.setBlocks(x1,y1-60,z1-50,x1,y1-58,z1+50,0)
mc.setBlocks(x1-1,y1+2,z1-1,x1-1,y1-60,z1-1,65,3)
# FASE 4: establishing main chambers
for pos in range(0,8):
    mc.setBlocks(x1+10+pos,y1-60,z1-pos,x1+10+pos,y1-58+pos,z1+pos,0)
    mc.setBlocks(x1-10-pos,y1-60,z1-pos,x1-10-pos,y1-58+pos,z1+pos,0)
    mc.setBlocks(x1-pos,y1-60,z1+10+pos,x1+pos,y1-58+pos,z1+10+pos,0)
    mc.setBlocks(x1-pos,y1-60,z1-10-pos,x1+pos,y1-58+pos,z1-10-pos,0)

mc.setBlocks(x1+18,y1-60,z1-8,x1+18+24,y1-50,z1+8,0)
mc.setBlocks(x1-18,y1-60,z1-8,x1-18-24,y1-50,z1+8,0)
mc.setBlocks(x1-8,y1-60,z1+18,x1+8,y1-50,z1+18+24,0)
mc.setBlocks(x1-8,y1-60,z1-18,x1+8,y1-50,z1-18-24,0)

for pos in range(0,8):
    mc.setBlocks(x1+18+24+pos,y1-60,z1-8+pos,x1+18+24+pos,y1-50-pos,z1+8-pos,0)
    mc.setBlocks(x1-18-24-pos,y1-60,z1-8+pos,x1-18-24-pos,y1-50-pos,z1+8-pos,0)
    mc.setBlocks(x1-8+pos,y1-60,z1+18+24+pos,x1+8-pos,y1-50-pos,z1+18+24+pos,0)
    mc.setBlocks(x1-8+pos,y1-60,z1-18-24-pos,x1+8-pos,y1-50-pos,z1-18-24-pos,0)

# FASE 5: establishing lights &amp; doors:
# FASE 5.1: central chamber lights:
mc.setBlock(0,-57,1,50)
mc.setBlock(1,-57,0,50)
mc.setBlock(0,-57,-1,50)
mc.setBlock(-1,-57,0,50)
# FASE 5.2: main chambers lights
for pos in range(2,8):
    mc.setBlock(x1+pos,y1-58,z1+10+pos,50)
    mc.setBlock(x1-pos,y1-58,z1+10+pos,50)
    mc.setBlock(x1+pos,y1-58,z1-10-pos,50)
    mc.setBlock(x1-pos,y1-58,z1-10-pos,50)
    mc.setBlock(x1+10+pos,y1-58,z1+pos,50)
    mc.setBlock(x1+10+pos,y1-58,z1-pos,50)
    mc.setBlock(x1-10-pos,y1-58,z1+pos,50)
    mc.setBlock(x1-10-pos,y1-58,z1-pos,50)

for pos in range(0,24,2):
    mc.setBlock(x1+8,y1-58,z1+18+pos,50)
    mc.setBlock(x1-8,y1-58,z1+18+pos,50)
    mc.setBlock(x1+8,y1-58,z1-18-pos,50)
    mc.setBlock(x1-8,y1-58,z1-18-pos,50)
    mc.setBlock(x1+18+pos,y1-58,z1+8,50)
    mc.setBlock(x1+18+pos,y1-58,z1-8,50)
    mc.setBlock(x1-18-pos,y1-58,z1+8,50)
    mc.setBlock(x1-18-pos,y1-58,z1-8,50)

for pos in range(0,7):
    mc.setBlock(x1+8-pos,y1-58,z1+18+24+pos,50)
    mc.setBlock(x1-8+pos,y1-58,z1+18+24+pos,50)
    mc.setBlock(x1+8-pos,y1-58,z1-18-24-pos,50)
    mc.setBlock(x1-8+pos,y1-58,z1-18-24-pos,50)
    mc.setBlock(x1+18+24+pos,y1-58,z1+8-pos,50)
    mc.setBlock(x1+18+24+pos,y1-58,z1-8+pos,50)
    mc.setBlock(x1-18-24-pos,y1-58,z1+8-pos,50)
    mc.setBlock(x1-18-24-pos,y1-58,z1-8+pos,50)
# FASE 5.3: doors
mc.setBlock(x1,y1-60,z1+2,64,1)
mc.setBlock(x1,y1-59,z1+2,64,8)
mc.setBlock(x1,y1-58,z1+2,1)
mc.setBlock(x1,y1-60,z1+10,64,3)
mc.setBlock(x1,y1-59,z1+10,64,8)
mc.setBlock(x1,y1-58,z1+10,1)

mc.setBlock(x1,y1-60,z1-2,64,3)
mc.setBlock(x1,y1-59,z1-2,64,8)
mc.setBlock(x1,y1-58,z1-2,1)
mc.setBlock(x1,y1-60,z1-10,64,1)
mc.setBlock(x1,y1-59,z1-10,64,8)
mc.setBlock(x1,y1-58,z1-10,1)

mc.setBlock(x1+2,y1-60,z1,64,4)
mc.setBlock(x1+2,y1-59,z1,64,8)
mc.setBlock(x1+2,y1-58,z1,1)
mc.setBlock(x1+10,y1-60,z1,64,2)
mc.setBlock(x1+10,y1-59,z1,64,8)
mc.setBlock(x1+10,y1-58,z1,1)
mc.setBlock(x1-2,y1-60,z1,64,2)
mc.setBlock(x1-2,y1-59,z1,64,8)
mc.setBlock(x1-2,y1-58,z1,1)
mc.setBlock(x1-10,y1-60,z1,64,4)
mc.setBlock(x1-10,y1-59,z1,64,8)
mc.setBlock(x1-10,y1-58,z1,1)

Source

Custom textures on Minecraft Pi Edition!

threebuddies has found a way to install custom textures on Minecraft Pi Edition!  Here’s his instructions:

HOW TO INSTALL
note: this will only update the terrain of MC, if you want you could place in the files from the textrue pack zip and place them into the correct folder in /home/pi/mcpi/data/images. There are no mobs in this edition of mc.

-download the texture pack into the default folder for downloads on the pi
-extract the .zip that you just downloaded, do this by right clicking and clicking on “extract here”
-navigate to /home/pi this is where the texture pack should of downloaded
-open up the folder “assets” and copy the terrain.png file in that folder
-navigate to /home/pi/mcpi/data/images in the file browser
-rename the terrain.png file in /home/pi/mcpi/data/images to terrainback.png this is a backup of the terrain.png
-Right click and paste the terrain.png file in to the /home/pi/mcpi/data/images folder

-Load up MC:PI and now you should be using the texture pack you just installed

And here’s an image showing the custom textures on a Pi!